This video and info will give you some ideas on installing your new Stratocaster pickguard. Below is a list of steps and other related tips.
HANDY CHECKLIST
- It’s best to remove strings and set them off to the side if you haven’t installed a pickguard before, they can stay through the body but disconnect them from the machine heads.
- Put a protector over your finish, especially by the top right, you don’t want to scrape it or get solder on it.
- Make sure you always put your solder gun back in the holder and the holder is in a safe location in case it fell over.
- Flip the pickguard over, lay it out and carefully remove the existing wires, pay attention to the ground wires, the one from the BACK cavity you can reuse so unsolder it from the pot. If it’s connected to the lug only leave it there.
- Carefully remove the wires. You CAN reuse the existing wires from the jack but the pickguard comes with wires that go there.
- Double check ALL solder joints you make.
- Reuse EXISTING screws if you are swapping pickguards. The pickguard comes with screws but it’s always best to use the originals if you have them.
- If possible, plug it into the amp BEFORE you screw it back and and put all the strings back up to tension. TAP the top of each pickup in each switch position and verify they have output. (NOTE: The selector switch affects which pick up will make a sound.
- Bring the strings up to Tension, stretch them, and then bring them up to tune AGAIN (rinse and repeat until stable tuning is achieved).
GROUNDING:
Did you hook it up and get a ton of hum? There are many issues that can happen when hooking up a loaded pickguard but for the most part it’s easy to figure it out. The most common is the lack of proper ground. This usually results in a LOUD Hum. The following is a lit of things to check.
It doesn’t matter which part you connect the ground to. It won’t affect your TONE! – Normally the back of the volume pot is a common location.
- Is there a ground wire to the claw in the back of the Stratocaster?
- Is there a ground wire to the LUG on the inside of the body cavity (not all strats have this).
- Is the ground wire connected from the BODY of the volume pot to the RING of the jack? (Or is connected to a grounded wire?)
- Is the hot wire accidently touching the ground wire at any point at the jack or on the back of the pickguard.
- Check all the soldering work, are any of them extremely dull or loose?
- Is there a lot of Bare wire that could touch another wire?
If you have an ohm meter, measure between the jack and body of the volume pot to verify you have a good connection.
You can actually measure with the pickguard on. Get one of your cables and remove the sleeve. Connect one ohm meter connection to the each of the leads, you should measure a “K” value with volume all the way up that will be roughly the pickup value – 8% percent ish.
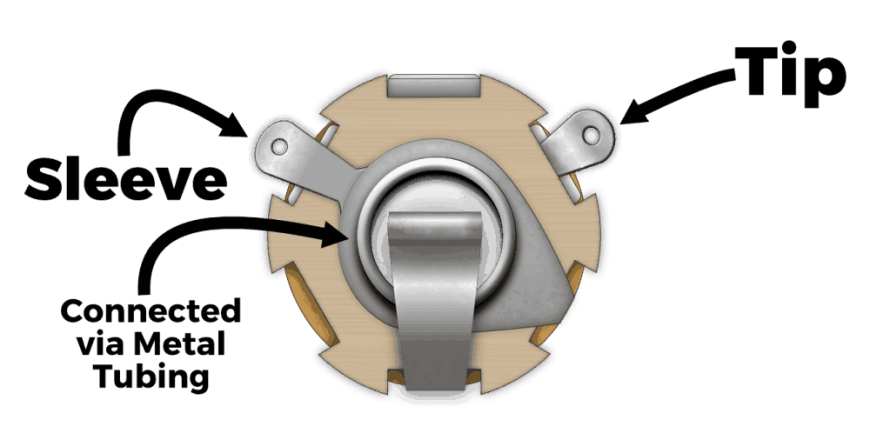
BELOW: The TIP is connected to the RED wire, the SLEEVE is connected to the ground (Black) wire – The Red wire goes to the center lug of the volume pot and the black wire is soldered to the back of the volume pot.
See our new Soldering Advice page. This isn’t the end all page but will get you a quick overview on tools, solder and what you might need to get going.
Recommended STEP BY STEP
Connecting to the Jack
- REMOVE old wires from the old pickguard at the jack.
- Remove the old pickguard
- Flip the new pickguard over and protect the finish of your guitar
- Route the RED wire to the TIP on the jack
- Route the BLACK (or green) wire to the SLEEVE on the jack
- You should now have 2 wires going to the jack.